Wednesday, December 9, 2015

New ultra-fast light beam Wi-Fi


Researchers at Oxford University have developed a new technology that delivers ultra-high-speed Wi-Fi (224 Gbps) via light beams. In the future, “Li-Fi” could allow Internet users to download a 1.5Gb movie in the blink of an eye.
The true enormity of this step change in Wi-Fi download speed becomes apparent when one considers that current high speed fibre optic cables deliver 1Gbps.  Moreover, in the USA, access to 1Gbps is only offered by a small number of providers in a few locations.  It is estimated that, ultimately, Li-Fi technology could offer up to 3 Terabits per second.
There are inherent problems with using light as a data transfer medium. Cables “contain” the light, using internal reflection to guide the beam along its way.  Containing the beam in the air is another matter altogether. To address the issue, the Oxford boffins have fitted both transmitter and receiver with holographic beam steering technology and then created programmable diffraction using an array of liquid crystals. And rather than using visible light, the researchers have used infrared light at 1550nm, so invisible to the naked eye. Clever stuff indeed.
The technology is limited in its application, since light cannot pass through opaque objects.  Therefore both transmitter and receiver need an uninterrupted direct line of sight. In addition, download speed diminishes as the receiver’s field of view narrows. Despite these limitations, the researchers assert it is only a matter of time before a tracker system is developed which will potentially allow a laptop to connect from a random spot on a table. 
The research is part of a broader ambition to develop light-based wireless communications which use the light which already illuminates a room.

 Sources:
1. Tech Times:  'Oxford Researchers Achieve 224Gbps Connection Using Light: Li-Fi Will Let You Download 1.5GB Movie in a blink.

2. The Telegraph:Researchers develop 100Gps light based wireless network.

Light Fidelity (Li-Fi) - The bright future of 5G visible light communication systems

Picture this-you wake up and tap your smartphone to switch on your coffee machine. As you make breakfast, your refrigerator sends you a text that you’re out of orange juice. Clued in with this message, your car’s GPS routes you to the grocery shop on your way back from work, as you use your phone to switch on your home heating system, so things are toasty warm when you get back. At the forefront of this connectivity phenomenon popularly known as the 'Internet of Things', is an optical communication technology that’s taking the world by storm. Light Fidelity or Li-Fi, is an exciting breakthrough in 5G visual light communication systems and the future of wireless Internet access.
With Li-Fi, information hitches a ride along a spectrum of visible light. Light-emitting diode (LED) bulbs, transmit data when they are switched on and off so rapidly in nanoseconds, that the human eye cannot see it. This data is registered by special equipment, making it possible to provide wireless Internet connectivity at a current experimental speed up to 10 Gbps, which is estimated to be 250 times faster than 'superfast' broadband. The vast availability of LED light bulbs will drive the future ubiquity of connectivity even in places where Wi-Fi fails-on an airplane and in submarines, for example.
Another advantage of Li-Fi is zero electromagnetic interference, allowing connectivity even in areas where Wi-Fi isn’t accepted - hospitals and nuclear plants among others. In addition, Li-Fi offers better data defense as light waves can’t pass through walls, making it impossible to hack any internal systems in high-security buildings.
As radio waves used by Wi-Fi get more congested and the demand for faster and more efficient wireless communication escalates, the future is bright for Li-Fi as a reliable, affordable and more secure solution.
Harold Haas from the University of Edinburgh, who first demonstrated Li-Fi to the world, envisioned turning light bulbs into super-speed broadband wireless Internet systems. As Li-Fi becomes more commercialized, it will usher in an era of incredible business opportunities, such as allowing telecom service providers to reach out to a wider customer base. We can look forward to broader accessibility with Li-Fi Cloud. Smartphones will soon be able to download traffic information from traffic lights or a program guide from a television. This is the tip of the iceberg. In the future, shops will transmit advertisements to your phone as you pass by and bus schedule changes will be transmitted to a screen at the stop. Smarter home appliances that talk machine-to-machine (M2M) are already being extensively researched, where LED lights on electronics function as Li-Fi access points. In fact, the Li-Fi industry is set to become a $6 billion industry by 2018.How else do you think that Li-Fi will revolutionize the way we connect with man and machines?

Network E-Learning in Hindi

Students can access hundreds of practical lab activities and video based lectures from extremely qualified instructors in CCNA V2.0 (ICND 1 and ICND 2), RHCSA 1, RHCSA 2, MCiTP, PHP and many more. We are currently recording videos in CCNP, VoIP, CCNA Security, Various web certifications, and of course suggestions are always welcome. We want to make sure that Urdu, Hindi, Punjabi students can establish a strong foundation in Information Technology.


Urdu IT Academy


Courtesy


Mr Kashif (Founder)
Cisco/Microsoft Trainer

Being a founder and instructor of Urdu IT academy Kashif is busy setting up the vision of Urdu IT academy and expanding the certification video education library Kashif has been involved in training and consulting for over 10 years, covering technology in Microsoft, HP, Cisco and Information security. Kashif has achieved his first certification soon after completing his college and got a place on rostrum in 10th grade to start teaching (Thanks to his uncle). He has acquired a lot of certification which he feels are not enough that includes MCP, MCSE, MCSE+I, CCNA, CCDA, CCDP, CCNP, CCSP, ITIL, JNCIA, JNCIS, SCP, Network audits, security certification and finally CISSP, He has recently qualified for CEH Kashif has two Sons, so spare time is taken up as a homework monitor. Kashif's other interest, out of computer research is to play lots of computer games and Xbox with kids and play badminton when eager to adopt a healthy lifestyle.

Tuesday, August 4, 2015

Install NS2 (ns-allinone-2.35) on Ubuntu 11.04 for beginners

#======================
Part I: Introduction
#======================
This installation guide is on Linux Ubuntu 11.04 (download from here), and  uses ns-allinone-2.35 source file for NS2. I assume that you have the skill to install Ubuntu, so I skip this process, and focus on the installation of NS2 (step-by-step with commands).
#========================
Part II: Installation
#========================
[Step 1]
Before install NS2, you have to install some essential softwares:
sudo apt-get install tcl8.5-dev tk8.5-dev
sudo apt-get install build-essential autoconf automake 
sudo apt-get install perl xgraph libxt-dev libx11-dev libxmu-dev
[Step 2]
Download NS2 source file  from from here.
Then you will get a file named “ns-allinone-2.35.tar.gz
[Step 3]
Unpack ns-allinone-2.35.tar.gz to your home directory. (/home/stan is my home directory, you SHOULD change it to your own!)
tar -zxvf ns-allinone-2.35.tar.gz -C /home/stan
[Step 4]
4.1) Modify the makefile (NOTICE: I use “vi” for an editor, you can use “gedit” instead)
vi /home/stan/ns-allinone-2.35/otcl-1.14/Makefile.in
4.2) Change CC = @CC@ to CC = @CC@ -V 4.5
(For changing this because the gcc complier in Ubuntu 11.04 is version 4.5, however NS2 only supports gcc-4.3 below. NOTICE the V is capital.)
[Step 5]
Install NS2:
cd /home/stan/ns-allinone-2.35
sudo ./install
[Step 6]
6.1) Modify  .bahrc
vi /home/stan/.bashrc
6.2) Go to the last line and add the scripts below:
export PATH=$PATH:/home/stan/ns-allinone-2.35/bin:/home/stan/ns-allinone-2.35/tcl8.5.10/unix:/home/stan/ns-allinone-2.35/tk8.5.10/unix
export LD_LIBRARY_PATH=$LD_LIBRARY_PATH:/home/stan/ns-allinone-2.35/otcl-1.14:/home/stan/ns-allinone-2.35/lib
export TCL_LIBRARY=$TCL_LIBRARY:/home/stan/ns-allinone-2.35/tcl8.5.10/library 
6.3) Enable the path setting:
cd /home/stan
source .bashrc
#======================
# Part III: Verifying
#======================
which ns
If it shows /home/stan/ns-allinone-2.35/bin/ns,  it works!

Introduction to the Windows Command Prompt

Table of Contents
  1. Introduction
  2. Using the Command Prompt or Dos Window
  3. Useful commands
  4. Redirectors
  5. Batch Files
  6. Console Programs
  7. Conclusion
Introduction
Before Windows was created, the most common operating system that ran on IBM PC compatibles was DOS. DOS stands for Disk Operating System and was what you would use if you had started your computer much like you do today with Windows. The difference was that DOS was not a graphical operating system but rather purely textual. That meant in order to run programs or manipulate the operating system you had to manually type in commands. When Windows was first created it was actually a graphical user interface that was created in order to make using the DOS operating system easier for a novice user. As time went on and newer versions of Windows were developed DOS was finally phased out with Windows ME. Though the newer operating systems do not run on DOS, they do have something called the command prompt, which has a similar appearance to DOS. In this tutorial we will cover the basic commands and usage of the command prompt so that you feel comfortable in using this resource.

Using the Command Prompt or Dos Window
When people refer to the command prompt they may we refer to it in different ways. They may refer to it as a shell, console window, a command prompt, a cmd prompt, or even dos. In order to enter the command prompt you need to run a program that is dependent on your operating system. Below we list the programs that you need to run to enter a command prompt based on the version of Windows you are running.
Operating System
Command
Notes
Windows 3.1,.3.11, 95, 98, MEcommand.comThis program when run will open up a command prompt window providing a DOS shell.
Windows NT, 2000, XP, 2003cmd.exeThis program will provide the native command prompt. What we call the command prompt.
Windows NT, 2000, XP, 2003command.comThis program will open up a emulated DOS shell for backwards compatibility. Only use if you must.
To run these programs and start a command prompt you would do the following steps:
Step 1: Click on the Start Menu
Step 2: Click on the Run option
Step 3: Type the appropriate command in the Open: field. For example if we are using Windows XP we would type cmd.exe.
Step 4: Click on the OK button
After following these steps you will be presented with a window that look similar to Figure 1 below.

Windows Command Prompt
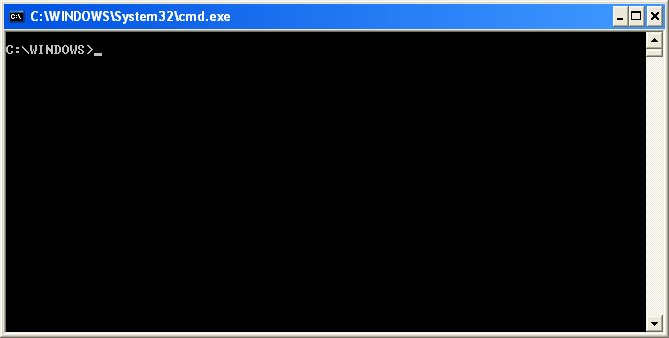
Figure 1. Windows Command Prompt

The command prompt is simply a window that by default displays the current directory, or in windows term a folder, that you are in and has a blinking cursor ready for you to type your commands. For example in Figure 1 above you can see that it says C:\WINDOWS>. The C:\WINDOWS> is the prompt and it tells me that I am currently in the c:\windows directory. If I was in the directory c:\program files\directory the prompt would instead look like this: C:\PROGRAM FILES\DIRECTORY>.
To use the command prompt you would type in the commands and instructions you want and then press enter. In the next section we will discuss some useful commands and how to see all available built in commands for the command prompt.

Useful commands
The command.com or cmd.exe programs have built in commands that are very useful. Below I have outlined some of the more important commands and further instruction on how to find information on all the available commands.
The Help command - This command will list all the commands built into the command prompt. If you would like further information about a particular command you can type help commandname. For example help cd will give you more detailed information on a command. For all commands you can also type the command name followed by a /? to see help on the command. For example, cd /?
The Exit command - This command will close the command prompt. Simply type exit and press enter and the command prompt will close.
The CD command - This command allows you to change your current directory or see what directory you are currently in. To use the CD command you would type cd directoryname and press enter. This would then change the directory you are currently in to the one specified. When using the cd command you must remember how paths work in Windows. A path to a file is always the root directory, which is symbolized by the \ symbol, followed by the directories underneath it. For example the file notepad.exe which is located in c:\windows\system32 would have a path as follows \windows\system32\notepad.exe. If you want to change to a directory that is currently in your current directory you do not need the full path, but can just type cd directoryname and press enter. For example if you are in a directory called c:\test, and there were three directories in that the test directory called A, B, and C, you could just type cd a and press enter. You would then be in the c:\test\a. If on the other hand you wanted to change your directory to the c:\windows\system32 directory, you would have to type cd \windows\system and press enter.
The DIR command - This command will list the files and directories contained in your current directory, if used without an argument, or the directory you specify as an argument. To use the command you would just type dir and press enter and you will see a listing of the current files in the directory you are in, including information about their file sizes, date and time they were last written to. The command will also show how much space the files in the directory are using and the total amount of free disk space available on the current hard drive. If I typed dir \test I would see the contents of the c:\test directory as shown in Figure 2 below.

Dir Command
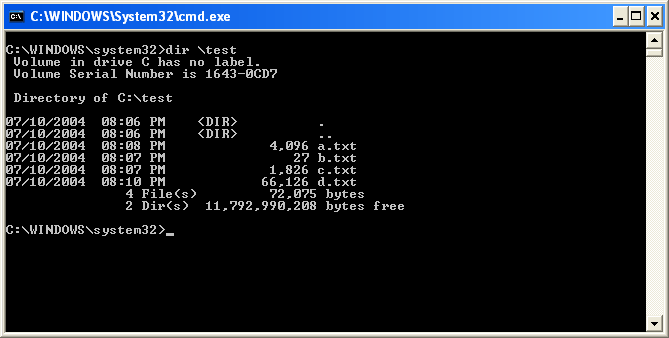
Figure 2. DIR of c:\test

If you examine the screen above you will see a listing of the directory. The first 2 columns are the date and time of the last write to that file. Followed by whether or not the particular entry is a directory or a file, then the size of the file, and finally the name of the file. You may have noticed that there are two directories named . and .., which have special meaning in operating systems. The . stands for the current directory and the .. stands for the previous directory in the path. In the example above, .. stands for c:\windows.
Also note for many commands you can use the * symbol which stands for wildcard. With this in mind, typing dir *.txt will only list those files that end with .txt.
The Copy command - This command allows you to copy files from one location to another. To use this command you would type
copy filetocopy copiedfile. For example if you have the file c:\test\test.txt and would like to copy it to c:\windows\test.txt you would type
copy c:\test\test.txt c:\windows\test.txt and press enter. If the copy is successful it will tell you so and give you back the prompt. If you are copying within the same directory you do not have to use the path. Here are some examples and what they would do:
copy test.txt test.bakCopies the test.txt file to a new file called test.bak in the same directory
copy test.txt \windowsCopies the test.txt file to the \windows directory.
copy * \windowsCopies all the files in the current directory to the \windows directory.
The Move command - This command allows you to move a file from one location to another. Examples are below:
move test.txt test.bakMoves the test.txt file to a new file renaming it to test.bak in the same directory.
move test.txt \windowsMoves the test.txt file to the \windows directory.
move * \windowsMoves all the files in the current directory to the \windows directory.
At this point you should use the help command to learn about the other available commands.

Redirectors
Redirectors are an important part to using the command prompt as they allow you to manipulate how the output or input of a program is displayed or used. Redirectors are used by appending them to the end of a command followed by what you are redirecting to. For example: dir > dir.txt. There are four redirectors that are used in a command prompt and they are discussed below:
>This redirector will take the output of a program and store it in a file. If the file exists, it will be overwritten. If it does not exist it will create a new file. For example the command dir > dir.txt will take the output of the dir command and place it in the dir.txt file. If dir.txt exists, it will overwrite it, otherwise it will create it.
>>This redirector will take the output of a program and store it in a file. If the file exists, the data will be appended to the current data in the file rather than overwriting it. If it does not exist it will create a new file. For example the command dir >> dir.txt will take the output of the dir command and appends it to the existing data in the dir.txt file if the file exists. If dir.txt does not exist, it will create the file first.
<This redirector will take the input for a program from a specified file. For example the date command expects input from a user. So if we had the commanddate < date.txt, it would take the input for the date program from the information contained in the date.txt file.
|This redirector is called a pipe. It will take the output of a program and pipe it into another program. For example dir | sort would take the output of the dir command and use it as input to the sort command.

Batch Files
Batch files are files that have an extension ending in .bat. They are simply scripts that contain command prompt commands that will be executed in the order they are listed. To create a batch file, just make a file that ends in .bat, such as test.bat, and inside the file have the commands you would like. Each command should be on its own line and in the order you would like them to execute.
Below is example batch file. It has no real use but will give you an example of how a batch files works. This test batch file contains the following lines of text:
cd
cd \test
dir
cd \
If I was to run the test.bat file I created I would have output that looks like the following:

Batch File
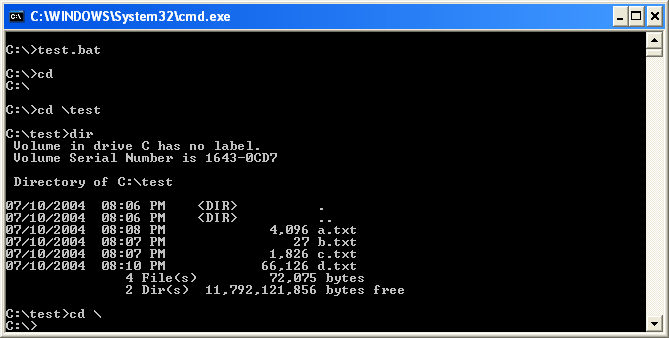
Figure 3: Example of a batch file running.

As you can see from the figure above, my batch file executed each command in my batch file in the sequence they were written in the batch file.

Console Programs
If a program is created for express purpose of running within a command prompt, or console window, that program is called a console program. These are programs that are not graphical and can only be run properly from within a command prompt window.
Below is a list of sites that contain console programs that may be useful to you:
There are many more sites that have tools available. Just do a Google search on windows console programs.

Conclusion
The command prompt can be a very powerful and versatile tool for a computer user. Hopefully this brief introduction into the command prompt will enable you to use your computer more efficiently.

Why and what is a SAN?

Computing is based on data. Data is the underlying resource on which all computing processes are based; it is a company asset. Data is stored on storage media, and is accessed by applications executing on a server. Often the data is a unique company asset. You cannot buy your data on the market, but rather you must create and acquire it day by day. To ensure that business processes deliver the expected results, they must have access to the data. Management and protection of business data is vital for the availability of business processes. Management covers aspects such as configuration, performance, and protection, which ranges from what to do if media fails, to complete disaster recovery procedures. In the mainframe environments, the management of storage is centralized. Storage devices are connected to the host, and managed directly by the IT department where a system programmer (storage administrator) is completely dedicated to this task. It is relatively straightforward and easy to manage storage in this manner. The advent of client/server computing created a new set of problems, such as escalating management costs for the desktop, as well as new storage management problems. The information that was centralized in a mainframe environment is now dispersed across the network and is often poorly managed and controlled. Storage devices are dispersed and connected to individual machines; capacity increases must be planned machine by machine; storage acquired for one operating system platform often cannot be used on other platforms.


Thursday, November 20, 2014

Ping vs. Traceroute vs Pathping


One of the biggest misconceptions of all time in networking is the use of a traceroute to determine that your communication with a server has high latency. On windows, traceroute is the same command as tracert.
Many people beleive that when they see high latency such as 250ms+ in a single hop of a trace-route that it means that that device in the transit path is responsible for the degraded network performance when in fact it could not be more further from the truth.
First lets look at how ping works.
PING, is an application based on the ICMP protocol which is used to send echo packets to a destination and expecting to receive an echo response and it calculates the RTT (Round Trip Time) from when the packet was sent to when the echo response was received. Generally when using PING on a LAN network you can trust that what it is saying is accurate unless you have foreknowledge of network devices in the transit path that prioritize ICMP over mission critical TCP/UDP Traffic. This however is very common in networks that utilize unified communications, meaning voice and data on the same network. This is because QoS Policies are put in place to ensure voice traffic and other mission critical traffic is prioritized over ICMP thus indirectly affecting the RTT time of an ICMP ping test.
Trace-route is another method commonly used by technicians and engineers to diagnosis latency in the transit path however any engineer that has studied how trace-route works would know that its results are nearly always misleading.
Trace-route works in a manner similar to ping however it uses the TTL feature to make each successive hop in the transit path respond with an ICMP TTL Expired packet. Thus gives you the ability to determine which network devices the ICMP packet is traversing.
When you dig deeper into the operation of traceroute you will see that traceroute utilizes 3 probe packets for each successive hop by default unless you specify other wise. Each probe packet indirectly measures the latency between the source and the device where the TTL is declared expired. This latency calculation is a by product of its true intended purpose. Keep in mind even if you send probes to a device that is five hops away, random latency spikes in any four devices prior to the fifth hop can result in the fifth hop looking like it has high latency.
Also note that any Control Plane Policing policy enforced on any device in the transit path could result in ICMP being prioritized to the control plane of the transit device. ICMP is processed switched by most devices whereas TCP/UDP is express forwarded.
An example below of a traceroute on Windows 7;
C:\>tracert www.google.com -d

Tracing route to www.google.com [74.125.225.113]
over a maximum of 30 hops:

  1     1 ms    <1 ms    <1 ms  10.100.38.2
  2     1 ms     1 ms    <1 ms  209.51.231.145
  3     5 ms     4 ms     3 ms  64.65.234.204
  4     7 ms     7 ms     7 ms  64.69.98.140
  5    29 ms    29 ms    29 ms  64.69.97.217
  6    30 ms    29 ms    29 ms  64.69.97.219
  7    31 ms    31 ms    32 ms  128.242.186.161
  8    30 ms    30 ms    29 ms  129.250.197.146
  9    30 ms    29 ms    30 ms  209.85.254.120
 10    33 ms    30 ms    30 ms  209.85.240.150
 11    29 ms    30 ms    29 ms  74.125.225.113

Trace complete.

C:\>
You can see from the trace route shown above that there is 3 probes per hop between the source and destination and that it does not appear to have latency until traffic traverses 64.69.97.217
The whole point of this blog is to teach you how to interpret such data. Just because you see a spike in latency on the 5th hop does not mean that the 5th hop is causing latency. It can easily mean that the control plane in the device on the fifth hop is under marginal load and that the processor does not respond to the ICMP immediately due to other processes with priority.
Just because you see potential latency with trace-route, you should never expect that to be an accurate representation of latency for TCP/UDP traffic because ICMP and TCP/UDP traffic is treated completely different when it comes to the routers control/forwarding planes.
Most ISP’s use control-plane policing (CoPP) to prevent overwhelming ICMP flooding to a devices control plane. This type of flood prevention mechanism can also result in skewed data in trace routes.
Shown below is a simple CoPP Policy which can result in skewed trace route data.
!
class-map match-all Catch-All-IP
 match access-group 124
class-map match-all Management
 match access-group 121
class-map match-all Normal
 match access-group 122
class-map match-all Undesirable
 match access-group 123
class-map match-all Routing
 match access-group 120
!
policy-map RTR_CoPP
 class Undesirable
 police 8000 1500 1500 conform-action drop exceed-action drop
 class Routing
 police 1000000 50000 50000 conform-action transmit exceed-action transmit
 class Management
 police 100000 20000 20000 conform-action transmit exceed-action drop
 class Normal
 police 50000 5000 5000 conform-action transmit exceed-action drop
 class Catch-All-IP
 police 50000 5000 5000 conform-action transmit exceed-action drop
 class class-default
 police 8000 1500 1500 conform-action transmit exceed-action transmit
!
access-list 120 permit tcp any gt 1024 10.0.1.0 0.0.0.255 eq bgp
access-list 120 permit tcp any eq bgp 10.0.1.0 0.0.0.255 gt 1024 established
access-list 120 permit tcp any gt 1024 10.0.1.0 0.0.0.255 eq 639
access-list 120 permit tcp any eq 639 10.0.1.0 0.0.0.255 gt 1024 established
access-list 120 permit tcp any 10.0.1.0 0.0.0.255 eq 646
access-list 120 permit udp any 10.0.1.0 0.0.0.255 eq 646
access-list 120 permit ospf any 10.0.1.0 0.0.0.255
access-list 120 permit ospf any host 224.0.0.5
access-list 120 permit ospf any host 224.0.0.6
access-list 120 permit eigrp any 10.0.1.0 0.0.0.255
access-list 120 permit eigrp any host 224.0.0.10
access-list 121 permit tcp 10.0.2.0 0.0.0.255 10.0.1.0 0.0.0.255 eq telnet
access-list 121 permit tcp 10.0.2.0 0.0.0.255 eq telnet 10.0.1.0 0.0.0.255 established
access-list 121 permit tcp 10.0.2.0 0.0.0.255 10.0.1.0 0.0.0.255 eq 22
access-list 121 permit tcp 10.0.2.0 0.0.0.255 eq 22 10.0.1.0 0.0.0.255 established
access-list 121 permit udp 10.0.2.0 0.0.0.255 10.0.1.0 0.0.0.255 eq snmp
access-list 121 permit tcp 10.0.2.0 0.0.0.255 10.0.1.0 0.0.0.255 eq www
access-list 121 permit udp 10.0.2.0 0.0.0.255 10.0.1.0 0.0.0.255 eq 443
access-list 121 permit tcp 10.0.2.0 0.0.0.255 10.0.1.0 0.0.0.255 eq ftp
access-list 121 permit tcp 10.0.2.0 0.0.0.255 10.0.1.0 0.0.0.255 eq ftp-data
access-list 121 permit udp 10.0.2.0 0.0.0.255 10.0.1.0 0.0.0.255 eq syslog
access-list 121 permit udp 10.0.3.0 0.0.0.255 eq domain 10.0.1.0 0.0.0.255
access-list 121 permit udp 10.0.4.0 0.0.0.255 10.0.1.0 0.0.0.255 eq ntp
access-list 122 permit icmp any 10.0.1.0 0.0.0.255 echo
access-list 122 permit icmp any 10.0.1.0 0.0.0.255 echo-reply
access-list 122 permit icmp any 10.0.1.0 0.0.0.255 ttl-exceeded
access-list 122 permit icmp any 10.0.1.0 0.0.0.255 packet-too-big
access-list 122 permit icmp any 10.0.1.0 0.0.0.255 port-unreachable
access-list 122 permit icmp any 10.0.1.0 0.0.0.255 unreachable
access-list 122 permit pim any any
access-list 122 permit udp any any eq pim-auto-rp
access-list 122 permit igmp any any
access-list 122 permit gre any any
access-list 123 permit icmp any any fragments
access-list 123 permit udp any any fragments
access-list 123 permit tcp any any fragments
access-list 123 permit ip any any fragments
access-list 123 permit udp any any eq 1434
access-list 123 permit tcp any any eq 639 rst
access-list 123 permit tcp any any eq bgp rst
access-list 124 permit tcp any any
access-list 124 permit udp any any
access-list 124 permit icmp any any
access-list 124 permit ip any any
!
control-plane
 service-policy input RTR_CoPP
!
If you examine the CoPP policy in detail you will notice that all ICMP destined to the control plane is limited to 50000bps as shown below. It can bust up to 5000bps and if it conforms to the policy it is transmited, if it exceeds the policy the ICMP is dropped.
class Catch-All-IP
 police 50000 5000 5000 conform-action transmit exceed-action drop
With this in mind you should always use trace route for its intended purpose which is to determine the route traffic takes when traversing the transit path and that latency shown on the per hop probe basis is to be taken with at grain of salt when traversing public devices.
The intended purpose of the 3 probe count is to determine if the traffic traverses multiple routed paths due to route engineering, not to determine the latency 3 times.
I will conclude this blog with the pathping command. This command found on windows is a command similar to traceroute but it combines traceroute with ping to give you a better understanding of latency in the transit path.
Pathping works first by doing a traceroute to the destination then it uses ICMP to ping each hop in the transit path 100 times. This is used to verify latency between the source and destination via icmp echo per each hop. But remember what I said earlier, you cannot rely ICMP when public devices are involved. So you can run into cases where you see ICMP pings destined to one hop in the transit drop 40% of the traffic whereas the next hop has 100% success rate. This is due to CoPP.
Pathping in general is a much better tool to diagnosis latency from a specific source to destination with arelative degree of accuracy. Note that I said Relative, this is because latency is ALWAYS relative to your location on the network.
Shown below is an example of pathping in the works;
C:\>pathping www.google.com -n

Tracing route to www.google.com [74.125.225.116]
over a maximum of 30 hops:
  0  10.100.38.162
  1  10.100.38.2
  2  209.51.231.145
  3  64.65.234.204
  4  64.69.98.171
  5  64.69.99.238
  6  165.121.238.178
  7  64.214.141.253
  8  67.16.132.174
  9  72.14.218.13
 10  72.14.238.232
 11  72.14.236.206
 12  216.239.46.215
 13  72.14.237.132
 14  209.85.240.150
 15  74.125.225.116

Computing statistics for 375 seconds...
            Source to Here   This Node/Link
Hop  RTT    Lost/Sent = Pct  Lost/Sent = Pct  Address
  0                                           10.100.38.162
                                0/ 100 =  0%   |
  1    1ms     0/ 100 =  0%     0/ 100 =  0%  10.100.38.2
                                0/ 100 =  0%   |
  2    0ms     0/ 100 =  0%     0/ 100 =  0%  209.51.231.145
                                0/ 100 =  0%   |
  3    4ms     0/ 100 =  0%     0/ 100 =  0%  64.65.234.204
                                0/ 100 =  0%   |
  4    6ms     0/ 100 =  0%     0/ 100 =  0%  64.69.98.171
                                0/ 100 =  0%   |
  5   22ms     0/ 100 =  0%     0/ 100 =  0%  64.69.99.238
                                0/ 100 =  0%   |
  6   10ms     0/ 100 =  0%     0/ 100 =  0%  165.121.238.178
                                0/ 100 =  0%   |
  7   34ms     0/ 100 =  0%     0/ 100 =  0%  64.214.141.253
                                0/ 100 =  0%   |
  8   37ms     0/ 100 =  0%     0/ 100 =  0%  67.16.132.174
                                0/ 100 =  0%   |
  9   35ms     0/ 100 =  0%     0/ 100 =  0%  72.14.218.13
                                0/ 100 =  0%   |
 10  ---     100/ 100 =100%   100/ 100 =100%  72.14.238.232
                                0/ 100 =  0%   |
 11  ---     100/ 100 =100%   100/ 100 =100%  72.14.236.206
                                0/ 100 =  0%   |
 12  ---     100/ 100 =100%   100/ 100 =100%  216.239.46.215
                                0/ 100 =  0%   |
 13  ---     100/ 100 =100%   100/ 100 =100%  72.14.237.132
                                0/ 100 =  0%   |
 14  ---     100/ 100 =100%   100/ 100 =100%  209.85.240.150
                                0/ 100 =  0%   |
 15   36ms     0/ 100 =  0%     0/ 100 =  0%  74.125.225.116

Trace complete.

C:\>
As you can see from the pathping shown above there are some hops in the transit path that completely drop ICMP. You can also notice that the latency to hop 5 is higher then the latency is to hop 6. This shows that either Control Plane Policing is used on 64.69.99.238 or the process utilization on hop 5 is relatively higher.
You should know that there are other tools out there that are extremely useful when trying to diagnosis latency related problems. Most of these tools rely on ICMP and your decision to trust them is based on your understanding the transit path. One of these tools being Ping Plotter. There are several useful tools included in the Solarwinds Engineers Toolset however this toolset is extremely expensive. You can download a trial and check it out at Solarwinds Engineers Toolset
The most accurate tools depend on TCP however since TCP is a connection oriented protocol, both the source and destination must be willing to participate in the testing. Some tools are hardware based such as the Fluke Network EtherScope which cost several thousand dollars.
So in conclusion, your decision to trust and use data from ICMP based troubleshooting should be based on your relative understanding of the transit path. You should never take a traceroute that has high latency on it and say its a network issue just because hope 7 has latency greater then 250ms. This is no different the a doctor telling you your spleen is the result of your headaches without factual basis.
If you do not have clear factual data when diagnosing a problem and you blame the network because of a traceroute, you may very well be completely missing the root cause of the problem. Think of it as getting tunneled vision when sh!t hits the fan and management is expecting answers and the first thing you notice is high latency on a traceroute. With out completely understanding traceroute you may be fixating on an issue that is really not an issue at all.

Friday, September 19, 2014

Learn Engineering and Professional Courses Book Here

i Learners ,

Welcome Learners 

Engineering and Programming Books 
Need any Ebook contact : sobhi89@gmail.com or +91-9467572809 (watsapp only)

For Downloading E-books :
1. Go to Bookforce1
2. Click on Folders
3. Download your Fav File

https://sites.google.com/site/bookforce1/

Saturday, March 30, 2013

How To Make A Bootable Usb For Windows 8

Hope My All Fans Are Fine.Many Person Want To How To Make A Bootable Usb Or Flash Drive,How to Create Bootable Windows 8 USB,How To Create Bootable Windows 7 UsbDrive From Iso Image.This Topic Uploaded Byfullypcgames.blogpsot.com Now I Am Share This Topic WithEasy Method.

Just You Have Need 3 Items.

1)   1st 4gb Flash Drive.... 
2)   Software For Make Bootable Usb... DownloadPassword=fullypcgames.blogspot.com
3)   Download Window 8 Or Window 7 Its Your Choice....Window 7,Window 8

Follow Steps 
1) plug 4gb usb, 4gb minimum Size 
2)Run Software You have already downloaded This 
3)Step 2 click browse and select Iso file and click next.
4)Choose Usb to make bootable usb .
5)Now select usb drive and click begin copying.
6)wait a moment for complete progress.
7)After That Your bootable usb Done !
Enjoy.Post comments Below post And  Share With YourFriends Thanks.

Process Screen Shot!


How can I break the memory card password on my Mobiles

The use of memory cards is increasing day-by-day, flash memory being one of the most crucial. Micro SD Cards</gras> are compact space saving memory devices which can create a headache if their password is lost. This article will discuss the way to find out the memory card's passwordquickly. When the password to a Micro SD Card</gras> gets lost, the card is blocked and none of the information inside it can be accessed. Interfacing your computer and the mobile via Bluetooth can restore and reset the password. Infrared can also be used to regain access to the files. 


This article tells you how to recover a a micro SD card password and micro SD card password reset. 
This document deals with the issue of losing a password for a MICRO SD card. If the password for the card is lost then it will be blocked for further use.www.fullypcgames.blogspot.com In such a situation, the user can interface their mobile with the PC using Bluetooth or Infrared, make the changes then find the password in the file created thereafter. 

Issue

I have lost the password for my 1GB micro SD card and now it is blocked. 

Solutions

Solution one:

  • Go to file manager on your mobile
  • In Settings choose system folders,
  • In the System folder, find a file called mmcstore
  • Send the file to your PC using IR/Bluetooth
  • Open the file in Notepad
  • The password you need for your memory card is located within that file

Solution two:

1. Insert your card into your phone, without accessing it through the phone 

2. Run FExplorer and Open the path C:\system 

3. Find the file called mmcstore, and rename it mmcstore.txt 

4. Copy that file (mmcstore.txt) to your PC and open it in Notepad 

5. Your password will be located within that file. 
6. Download FExplorer
For Micro SD : - 

Put the card in any E series mobile or N95 etc and format it. It will not ask for a password. 

Cisco Discovery Protocol For Windows

UPDATE: Checkout and download my CDP client for Windows over on github

 Lets face it.  We have all been there; "where does this network cable / uplink / port go?"

Until now, it has been a matter of looking up cable numbers in databases, fiddling about in the back of server and network racks or worst case - sending the smallest guy down to play hunchback in the windy air conditioned gloom under the floor.

There must be a better way to tell where a network cable goes to without having to go to all that trouble every time...

Well there is.  It's called Cisco Discovery Protocol (CDP).  From Wikipedia:

The Cisco Discovery Protocol (CDP) is a proprietary Data Link Layer network protocol developed by Cisco Systems that is implemented in most Cisco networking equipment and is used to share information about other directly connected Cisco equipment, such as the operating system version and IP address.

In other words, CDP packets will give you a lot of valuable information if you can capture them. They will give you all the details of the Cisco switch your on and the port on that switch you're connected to.  Of course as CDP is proprietary, you typically won't find it anywhere else other than on Cisco networking kit.

However, VMware knew all about this "trace the cable game" when they where putting together ESX and ESXi v3.5.  VMware's solution was to build in support for CDP on all physical network interfaces of the ESX Hypervisor:
VMware CDP in action

Well, this was a revelation!  For the first time us server techies can check up on the networks techies.  Not only could we tell instantly where a network cable was plugged in, we could tell them if it was in the wrong place too! [bwah ha haaa - rubs hands in a maniacal way!]

Of course this is OK for VMware Hypervisors and Linux based servers / desktops but what about Windows servers / desktops?

Capturing CDP is tough in Windows: CDPR will do it, as will Wireshark, but both require WinPcapto be installed.  This isn't really practical as potentially I want to find CDP data without installing any additional software or rebooting the host (WinPcap requires a reboot).

The Solution - TCPDump
I've found a version of TCPDump for Windows that was built on the WinPCap SDK; this means this little 500k utility can capture CDP packets on a machine without any additional tools.  What's more, as it's shipped as single command line .exe file, it's portable meaning it can be run from a USB stick, a batchfile, etc.  

You can get this updated version of TCPDump from micoOLAP

Using TCPDump
Quite simple, but don't be put off by the plethora of switches.

Firstly you need to find the interface number of the network adaptor you are trying to find CDP data for.  Use this command:

tcpdump -D

This will provide you information similar to this:
TCPDump Listing Interfaces

I'm interested in capturing data from my HP NC7782 Gigabit Adaptor; interface 2.

So lets run the command and capture some CDP data!  Here is the command:

tcpdump -i 2 -nn -v -s 1500 -c 1 ether[20:2] == 0x2000

Breaking this down:
  • -i 2 = interface 2
  • -nn = not resolving dns or port numbers
  • -v = verbose mode
  • -s 1500 = snagging up to 1500 bytes of the CDP packet
  • -c 1 = capture one packet before exiting 
  • ether[20:2] == 0x2000 = checking bytes 20 and 21 from the start of the ethernet header for a value of 2000 (hex)
Phew! I feel a batch file coming on, because I'm never going to remember all of that!

Here is what output looks like:
CDP Data in Windows!

Excellent.

Oh and by the way, tell the apprentice he can come out from under the computer room floor now, we know where these cables go.

*** UPDATE: 4 May 2010 ***
Here is the batch file I use to list adaptors, prompt for adaptor number and then run tcpdump on that adaptor:
@echo off
tcpdump -D
echo.
echo.
echo.
Set /P adaptor=Please Enter Adaptor Number to Listen on: 
tcpdump -i %adaptor% -nn -v -s 1500 -c 1 ether[20:2] == 0x2000
pause